
Andrew Kanieski
Software ArchitectPassionate Programmer
Loving Husband & Father of Three
Disclaimer: The opinions expressed herein are my own personal opinions and do not represent my employer’s view in any way.
Agentic AI – Is it ClickOps 2.0?
March 12, 2026
Over the past year or so we’ve seen a surge of tools promising Agentic AI. The pitch usually sounds something like this:
Give the AI a goal, and it will figure out the steps to accomplish it.
Deploy infrastructure, fix a broken pipeline, stand up a new service. Instead of writing scripts or infrastructure definitions, you describe the outcome and let the agent figure out the process.
On the surface, this sounds like a massive leap forward.
But it also feels strangely familiar.
A quick trip down memory lane
Before Infrastructure as Code became common practice, a lot of cloud infrastructure was built directly in web portals. You clicked here, added a resource, set a configuration, and hit save.
During the 2010s I was helping enterprises migrate to the cloud, and for me that mainly meant Azure because that was where my clients were already invested. Many organizations were in a mad dash to hop on the cloud bandwagon, and speed usually won over design.
That rush led to fragile cloud systems that were not well thought out. But at least back then, the same people were often the ones clicking around in the portal, and they maybe remembered how they had configured their resources.
As environments grew larger, that approach started to break down. It became difficult to track what had changed, harder to reproduce environments, and nearly impossible to audit reliably.
Eventually the industry gravitated toward declarative infrastructure using tools like Terraform, ARM/Bicep, and CloudFormation. Infrastructure moved into version control, deployments became repeatable, and environments became easier to reason about.
We even coined a name for the old way of doing things: ClickOps.
Enter the agents
Agentic AI flips the model again.
Instead of writing configuration code, we provide intent through natural language: “Deploy a secure Kubernetes cluster with monitoring enabled,” or “Fix the failing CI pipeline and redeploy the service.”
To be clear, Agentic AI is not inherently the problem. In many cases an agent can absolutely do the right thing by generating Infrastructure as Code, opening a pull request, and flowing through the same CI/CD guardrails we already trust.
The risk appears when guidance is vague and enforcement is weak. In that situation, the non-deterministic nature of LLMs means the agent might choose the path that looks fastest in the moment instead of the one that is most maintainable over time.
Which raises an interesting question: are we moving back toward ClickOps, just with a very capable robot doing the clicking?
The reproducibility problem
One of the major advantages of Infrastructure as Code is determinism. Given the same configuration, the same result should be produced every time.
Agent-driven workflows can be different.
Two similar prompts might produce slightly different solutions depending on context, model behavior, or changes in the surrounding environment.
That introduces practical concerns around auditing what changed, reproducing the same environment later, and rolling back when the agent makes a questionable decision.
A concrete example is an agent that decides to use Azure MCP directly to modify resources in real time rather than producing Infrastructure as Code and letting CI/CD apply it. Even if the result “works,” we have effectively slipped back into ClickOps, except now the clicking is abstracted away and easier to miss.
These are problems DevOps teams spent the last decade solving.
Where agents actually shine
That said, Agentic AI is genuinely useful when applied in the right places. It is great for generating infrastructure templates, scaffolding CI/CD pipelines, troubleshooting operational issues, and automating repetitive engineering tasks.
In these cases the agent acts more like a pair engineer than a replacement for the system itself.
The sweet spot
The workflow that seems to work best is straightforward: use agents to propose solutions, convert those solutions into declarative infrastructure or code, commit the result to source control, and let automation handle execution. Just as important, enforce that workflow with policy so agents cannot bypass it during moments of convenience.
Agents become a powerful design assistant, but the authoritative definition of the system still lives in version-controlled code.
Final thoughts
Agentic AI is a powerful tool, but convenience has a way of creeping into engineering workflows.
If the past decade taught us anything, it’s that repeatability beats convenience over time.
The practical takeaway is to keep your agents on the rails. Avoid giving them freedom to make direct-touch changes on real cloud systems whenever an IaC path is available.
Take the time to build strong instructions, prompts, and skills that consistently steer the agent toward Infrastructure as Code outputs that can be reviewed and deployed through CI/CD.
Agents may help us design systems faster, but keeping the blueprint in code is still what keeps those systems understandable.
Simple Azure Pipelines Service Now Change Control Validation
October 24, 2023
Many enterprise customers use Service Now for Change Control management. But some customers are not looking
for all the robust features Service Now offers in their DevOps integration module. If you’re looking for simple
way of validating a change control number during a pipeline’s execution, please find below a simple Task
template that can be used to validte change controls in service now.
Note: We could improve the below by switching from Basic auth to OAuth. Perhaps in a future post I can provide an example
parameters:
- name: changeControlNumber
  type: string
  displayName: Change Control Number
  default: 'CHG000000'
- name: serviceNowUri
  type: string
  displayName: Service Now Base Uri
  default: https://service-now-tenant.service-now.com
- name: serviceNowUser
  type: string
- name: serviceNowPassword
  type: string
- name: requiresAllActive
  type: boolean
  default: true

steps:
- powershell: |
    Get-ChildItem env:
    $url = "$($env:SYSTEM_TEAMFOUNDATIONSERVERURI)$env:SYSTEM_TEAMPROJECTID/_apis/git/repositories/$($env:BUILD_REPOSITORY_NAME)/pullRequests/$($env:SYSTEM_PULLREQUEST_PULLREQUESTID)/labels?api-version=5.1-preview.1"
    $response = Invoke-RestMethod -Uri $url -Method Get -Headers @{
        Authorization = "Bearer $env:SYSTEM_ACCESSTOKEN"
    }
    $val = $response.value.name -split ",\s*" | Where-Object { $_.StartsWith("CHG") } | ConvertTo-Json -Compress
    Write-Host "##vso[task.setvariable variable=PullRequestTags;isOutput=true]$val"
  displayName: Scan for PR Tags
  name: PR

- powershell: |
    try {
      $url = '${{ parameters.serviceNowUri }}'
      $combined = '${{ parameters.serviceNowUser }}' + ':' + '${{ parameters.serviceNowPassword }}'
      $bytes = [System.Text.Encoding]::UTF8.GetBytes($combined)
      $b64creds = [System.Convert]::ToBase64String($bytes)

      $headers = @{
          "Authorization" = "Basic $b64creds"
          "Accept" = "application/json"
      }

      $changeControlNumbers = '$(PR.PullRequestTags)' | ConvertFrom-Json
      if ($changeControlNumbers.length -eq 0) {
          $changeControlNumbers = '["${{ parameters.changeControlNumber }}"]' | ConvertFrom-Json
      }

      $requiresAllActive = '${{ parameters.requiresAllActive }}'
      $notActive = New-Object System.Collections.ArrayList($null)
      $areActive = New-Object System.Collections.ArrayList($null)

      foreach ($changeNum in $changeControlNumbers) {
          $response = Invoke-RestMethod "$url/api/sn_chg_rest/change?sysparm_query=number=$changeNum" -Headers $headers
          $active_cc = @($response.result | Where-Object { $_.active.value -eq $true })
          if ($active_cc.length -gt 0)
          {
            $areActive.Add($changeNum)
          } else {
            $notActive.Add($changeNum)
          }
      }

      if ($requiresAllActive -eq $true) {
          if ($areActive.length -ne $changeControlNumbers.length) {
              Write-Host "##vso[task.logissue type=error;] The following change controls are not active: $notActive"
              exit 1
          }
          else {
              Write-Host "All change controls provided are active ($areActive)."
              exit 0
          }
      }
      else {
          if ($areActive.length -gt 0) {
              Write-Host "At least one Change Control is active ($areActive)"
              exit 0
          }
          else {
            Write-Host "##vso[task.logissue type=error;] The following change controls are not active: $notActive"
            exit 1
          }
      }
    } catch {
      Write-Host "##vso[task.logissue type=error;] $_"
      exit 1
    }
  displayName: Validate Change Control
Quick and Easy Secret Scanning Using Git Hooks and Git Leaks
June 22, 2023
Have you ever mistakenly committed a config file or environment file that contains secrets or other sensitive data? Do you hate having to rewrite your Git History every time you make such a mistake?
What if you could have auto-magically spot secrets before you commit your code to your git repo?
Here is a simply way to block commits from your workstation that costs nothing and is very simple to setup.
Requirements
- Podman or Docker (Docker required for Windows)
- Access to ghcr.io where GitLeaks keeps its container images
Setup
Create a file in your .git/hooks directory called pre-commit. The .git/hooks
directory provides devs with a hook system that allows them to specify executables to run
at various points in the git workflow. More details can be found on Git Hooks
here.
In our case we will use the below script. The first thing it does is determine which OCI
solution is available on your workstation. It checks the path for podman first, and if
podman is not available, then it will check for docker. If neither are available, you will
need to get the gitleaks executable onto your machine and replace the container run
command with a call to the local gitleaks executable. (Perhaps I can show this on a later
post).
After determining the best way to run the gitleaks container image, it goes ahead and runs the gitleaks container image with the repo directory mounted. It lists out results directly in the console by default. After running it makes sure to capture the exit code from the container run and add logging and exit with either 1 if a secret is found, or 0 if no secrets are found. The Git Hooks system is designed to abort the commit if the pre-commit hook exits with a non zero exit code.
Now that the .git/hooks/pre-commit file has been created you can go ahead and make sure
the pre-commit hook is executable using chmod +x .git/hooks/pre-commit.
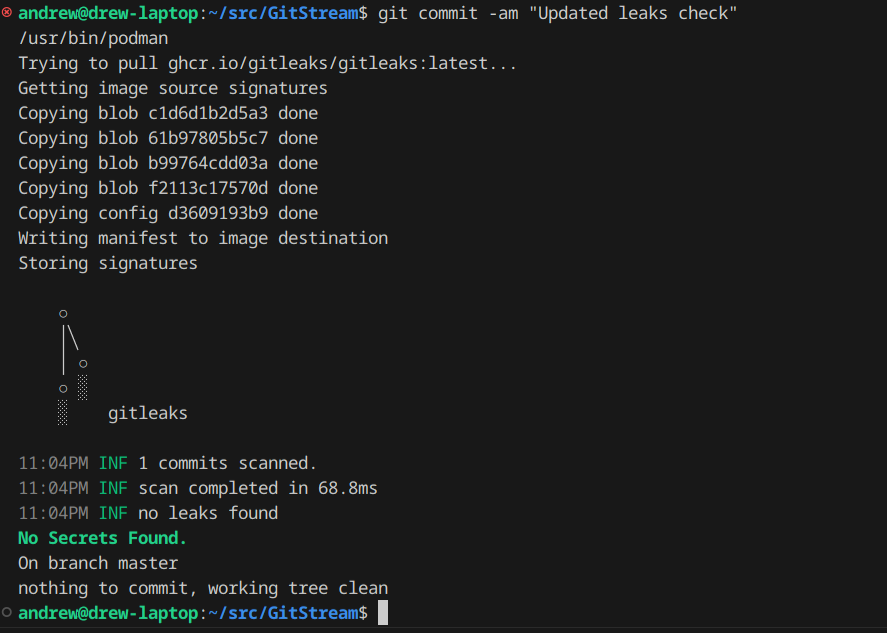
See below the results of a healthy commit:
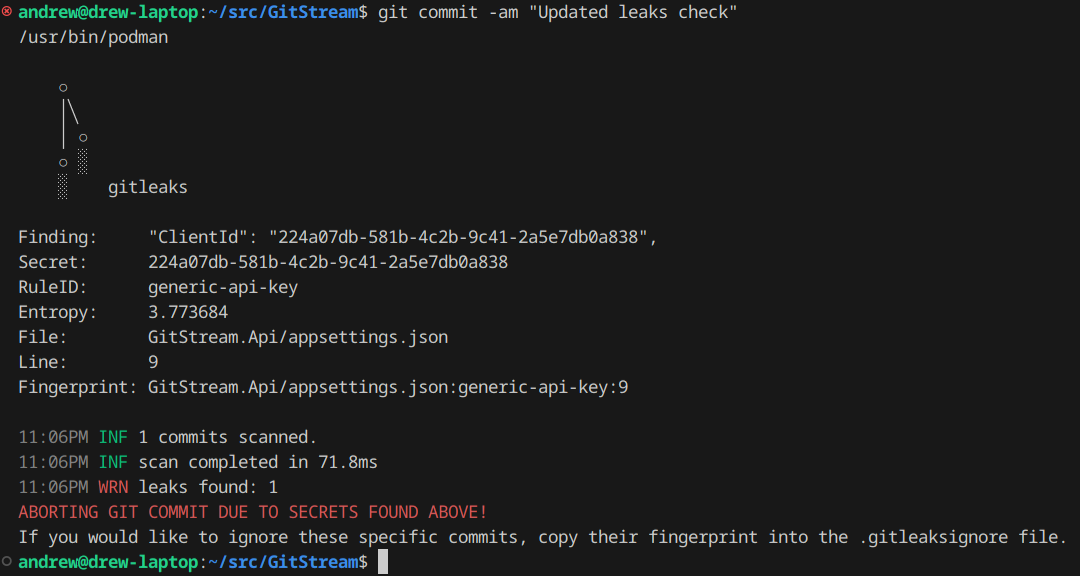
And now what it looks like when it spots a secret in your commit:
And what if there are false-positives? GitLeaks supports a .gitleaksignore file that
allows you to copy the fingerprint of the secret and add it to the ignore list.
For more information on GitLeaks, head over to their GitHub repository and check it out!
Downsides?
It was easy to setup, but the draw-back to using a git client hook is that the hook itself is never committed into the repo. It exists only locally on your workstation and has to be manually shared or scripted into existence to be used by other developers. So if your looking to bring this secret scanning to other team members, or worse across your entire organization then this solution is not the right fit. But what is?
A variety of software vendors now provide services that scan your source code for secrets, some will do this passively (see GitHub Advanced Security now available for both GitHub and Azure DevOps customers, some will even block commits to the vendor hosted repos if they contain secrets. But all of these services require a financial investment. For personal projects or for small businesses that do not want to fork over the cost for such services, this approach may work great for you.
Run Azure Pipeline Stages Only When Certain Files Change
March 25, 2023
Table of Contents:
Recently, I worked with a customer with an interesting challenge. They had spent a considerable amount of time implementing a robust Azure Pipelines template that allowed their operations teams to standardize their Pipelines across their enterprise.
One of the key solutions this pipeline provided was an opportunity for their database management team to control ‘Environments’ in Azure Devops. This database management team could enforce a variety of controls on their environments to ensure the safety and security of their shared database clusters. For example, these environments all required approvals before database changes could be executed in their environments. The team quickly was able to implement this requirement!
All is well in database-land, right? Well, as many can attest, sometimes well intentioned features can become more of an obstacle than a feature. Very quickly, app teams would notice that all of their deployments would suddenly require approvals. Why?
In this implementation, deployments to a given environment were all executed within a given stage. That stage contained database deployment jobs that would always trigger approvals, even when there were no database changes specified.
So, how can we address this issue? Let’s break it down into smaller problems.
How to identify what files have changed on a given commit?
Fortunately, git diff is a very simple command to grab a list of changes in a given commit or range of commits. You can specific the current commit using git diff --name-only HEAD~ HEAD. This will yield you a newline delimited set of files that were changed.
But what if my work is spread among many commits? This problem can be solved by triggering our deployments on Pull Requests back to master. When we make pull requests we have a variety of merge strategies. Both Basic (no fast-forward), Squash and Semi-Linear Merge will result in a final merge commit that contains the various changes made.
This means we can simply git diff --name-only HEAD~ HEAD and we’ll be able to get a list of all the files changes on the PR.
Below, I’ve wrapped up this git diff command with some extra bit of scripting as a re-usable task template. It allows you to specific a searchPattern to identify when SQL files have changed. And it also gives you the optional opportunity to publish the changes as an artifact.
One key parameter that this task template requires is the setVariableNamed parameter. This indicates where you would like to store the results of our file search. If the commit contains changes that match the given pattern then we set a variable of the given name. This variable will be consumed later on in the pipeline. Official docs on how this works can be found here.
How to conditionally trigger a stage?
Now that we have a template task that can identify changes to SQL files, we can go ahead and build out our pipeline.
Below our in our example we have a two stage pipeline. As part of the first stage we identify what files were changed, using our newly created task template, listed above.
Then we move on to our “conditional stage”. Notice the use of the condition on the stage’s definition. condition: eq(dependencies.AnalyzeStage.outputs['FirstJob.Changes.SqlChangesFound'], 'Yes') Here we are identifying that our stage is only to be execute if the outputs of the AnalyzeStage’s FirstJob.Changes.SqlChangesFound is equal to Yes. Notice the syntax used here. More details on this can be found in the official docs.
Additionally, its not just stages that can be made conditional, but jobs themselves.
Enjoy!
Andrew
Automatically Update Azure DevOps App Tier Servers with Latest Pipelines Agents
July 21, 2022
Some enterprise customers run their Azure DevOps Server behind a secured corporate Web Proxy. At times this can make it challenging for Pipelines agents to be able to download the latest Agent versions. Fortunately, Azure DevOps Server has a mechanism built in to cache Agent Installs locally on the App Tier Servers.
Please find below a script that can be used to automatically download the latest Pipelines Agent zips to your App Tier servers. You can put this in fact on a nightly Windows Scheduled Task to ensure your App Tier servers are providing agents across your enterprise with an opportunity to download the latest agent updates.
Horizontally scaleable, on-demand Azure Pipelines backed by Kubernetes!
July 9, 2022
Many enterprise customers run their own Kubernetes clusters either on-premise or in managed kubernetes environments in the cloud. Azure DevOps Services and Server agents can run from containers hosted in these Kubernetes clusters, but what if you do not want to run your agents 24/7? What if you need to be able to scale the number of agents dynamically as pipelines jobs are queued?
I’ve been working on a project that provides an application that can monitor a configurable set of agent pools, when pipeline jobs are queued up it will automagically provision Kubernetes Jobs for each job that is queued up. The Kubernetes Jobs will run and process only a single Pipelines Job and then be cleaned up by Kubernetes.
This allows for horizontally scaleable, on-demand agent pools backed by Kubernetes!
Check it out here!
Getting Started
You can first build the docker image:
# Build Orchestrator Container
docker build -t ado-agent-orchestrator

# Build Linux Pipelines Agent
cd linux
docker build -t ado-pipelines-linux
Run with Docker
docker run -d --name ado-agent-orchestrator \
    --restart=always \
    --env ORG_URL=https://dev.azure.com/yourorg \
    --env ORG_PAT=12345 \
    --env AGENT_POOLS=Pool1,Pool2 \
    --env JOB_IMAGE=ghcr.io/akanieski/ado-pipelines-linux:latest \
    --env JOB_NAMESPACE=ado \
    ado-agent-orchestrator:latest
Run with Kubernetes
apiVersion: apps/v1
kind: Deployment
metadata:
  name: ado-orchestrator-deployment
  labels:
    app: ado-orchestrator
spec:
  replicas: 1
  selector:
    matchLabels:
      app: ado-orchestrator
  template:
    metadata:
      labels:
        app: ado-orchestrator
    spec:
      containers:
      - name: ado-orchestrator
        image: ghcr.io/akanieski/ado-orchestrator:latest
        env:
        - name: ORG_URL
          value: "https://dev.azure.com/yourorg"
        - name: ORG_PAT
          value: "1234"
        - name: AGENT_POOLS
          value: "Pool1,Pool2"
        - name: JOB_IMAGE
          value: "ghcr.io/akanieski/ado-pipelines-linux:latest"
        - name: JOB_NAMESPACE
          value: "ado"
Additionally you can configure the following options environment variables.
POLLING_DELAY=1000     # Milliseconds to wait between runs
RUN_ONCE=1             # Only run once - use this to switch a cron job instead of 24/7 monitor run
JOB_PREFIX=agent-job-  # Customize the agent job's prefix